- MHC Sign & Design
- >
- Trailer Decals
Trailer Decals
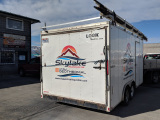
Trailer Decals are a simple easy way to advertise your brand everywhere you trailer goes!
We use a premium grade vinyl material that is highly durable to weather, car washes and will hold up for years! Provided are Quantity 2 decals (one per each side of trailer) Digitally printed multicolor designs with a High Grade Gloss Laminate to protect from scratches and road grime. Die-Cut and ready to apply easily to your trailer in a simple process. A Vinyl Squeegee applicator tool will be provided with your decals. We also include a 3rd logo for the back, as an extra and is sized at 27" Long.
Email us your logo or artwork and we will design a proof to show what your trailer decals will appear like on your trailer.
Quick production, within 24 hours after proof is approved, you job will begin.
We ship your decals USPS for the fastest and lowest prices.
Tools Needed:
Masking tape (2" recommended)
Tape Measure
Scissors to cut the backing liner
Squeegee Applicator tool (Provided in your Box we ship to you)
Xacto Knife or similar for trimming vinyl at seams.
Installation Instructions:
#1Remove the Screws using a #2 Square Bit (found at your local hardware store)
Clean the entire area using Glass Cleaner, Windex or Rubbing alcohol.
#2 Place vinyl graphic up on the side of trailer, tape graphic in place
measure height, width and level graphic to fender or top edge of trailer.
#3 Use tape to create a hinge top to bottom at the center of the graphic. Use additional tape to hold left and right sides of decals. (so you should have 3 pieces of tape holding decal in place, centered left, centered right, and top and bottom in center.
#4 Remove the tape from left or right side, peel back the graphic to center (basically fold in half) remove the backing liner on the half that is folded back all the way to the center top to bottom taped edge, use the scissors to cut the backing paper liner from the exposed sticky part of the decal. Then using the squeegee, holding the decal tight apply the decal to the trailer with up and down strokes from the center out to top and center out to bottom. all the way to the left or right edge.
#5 Repeat this step for the opposite side of decal.
#6Carefully remove the top layer of transfer paper and the masking tape at a 45 degree angle against the trailer side. trim with a knife any seams the vinyl applies over on the aluminum trailer sides.
#7 Re-install the screws with the #2 square bit.
#8 Stand back admire hard work.
#9 Repeat ALL steps for the opposite side of trailer and back door/ramp.
Enjoy, and tow with pride!
* indicates a required field


